Tynemouth Photographic Society


Sections in this page
Images must satisfy our competition rules about size.
Projected images and image files to accompany prints must be at most 1600 pixels wide by 1200 pixels high.
The following table may help.
| Image aspect ratio (width:height) | Competition width x height (pixels) |
|---|---|
| Landscape 3:2 (35mm camera) | 1600 x 1066 |
| Portrait 2:3 (35mm camera) | 800 x 1200 |
| Landscape 4:3 | 1600 x 1200 |
| Portrait 3:4 | 900 x 1200 |
| Landscape 16:9 | 1600 x 900 |
| Portrait 9:16 | 675 x 1200 |
| Square 1:1 | 1200 x 1200 |
| Anything else (perhaps you cropped) | Maximum 1600 x Maximum 1200 |
In your resizing software (program, app):
The result must be saved in JPEG format.
Note that one of the pixel dimensions is always less than that allowable, except in the case of 4:3 landscape.
Also note that the DPI (dots per inch) setting does not matter for these images (but it does for prints).
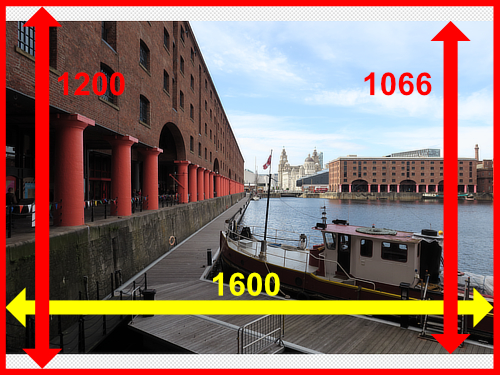
Example
Landscape 3:2 from full-frame DSLR, original size 5536 x 3692px,
becomes 1600 x 1066 which fits within the rules.
There are 2 ways to do this in Affinity Photo, as follows.
On the Document menu select Resize Document... (short-cut: Ctrl+Alt+I) to get this dialogue:
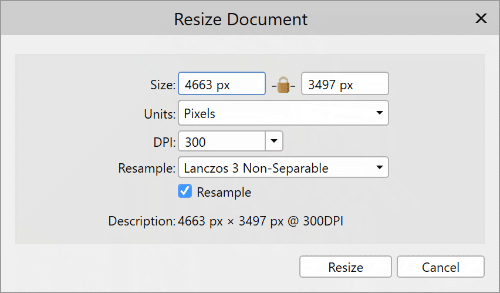
The line marked Size: shows the width first and then the height of the image.
Do NOT touch the lock icon between the width and height pixel values. Edit the first number to be 1600. The dialogue changes to:
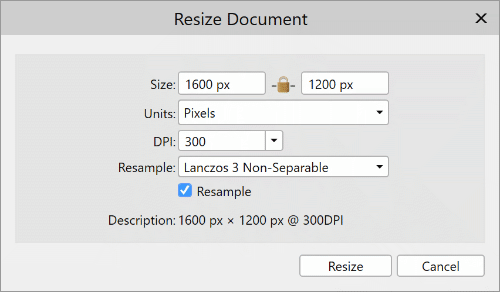
(This verifies that we did have a 4:3 landscape image in this case.) Then press the Resize button.
You can keep your image full size and just produce a scaled-down version. On the File menu select Export... (short-cut: Ctrl+Shift+Alt+S) to get this dialogue:
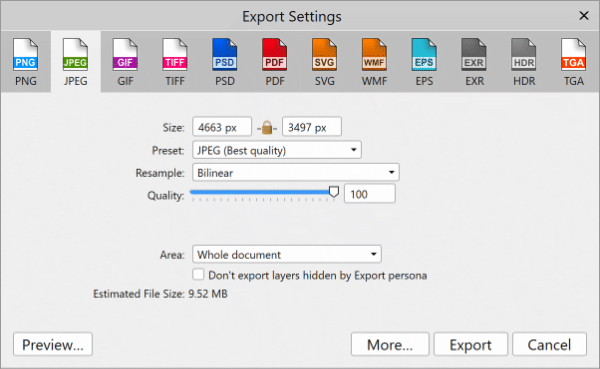
Make sure you select the JPEG option at the top. Then you can enter 1600 into the width as before. The file size will be recalculated and then you can click the Export button.
You could first click the More... button. This gives you a chance to prevent metadata being written into the file which might identify you (not good in competitions).
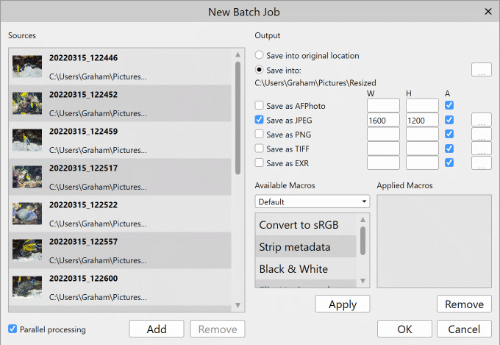
On the File menu select "New Batch Job...". By default this simply resizes images but it can be made to do more complicated things. The useful features for resizing are:
The dialogue for setting this up appears like this:
In Photoshop (CS4 shown here, in Windows 10) there are several ways to achieve the pixel size but we will describe the simplest.
On the File menu select Automate and then Fit Image... which opens this dialogue:
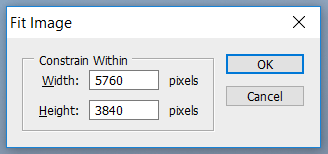
Type 1600 into the Width field and 1200 into the Height field and click OK. For the case shown here the result is an image 1600 x 1066 pixels because the original was not in the required proportion 4:3. That satisfies the requirement but you may decide to go back and crop the image first so you could use the full 1600 x 1200.
The keyboard short-cuts described above for Affinity Photo, Ctrl+Alt+I and Ctrl+Shift+Alt+S, also work in Photoshop, to produce dialogues with similar capabilities.
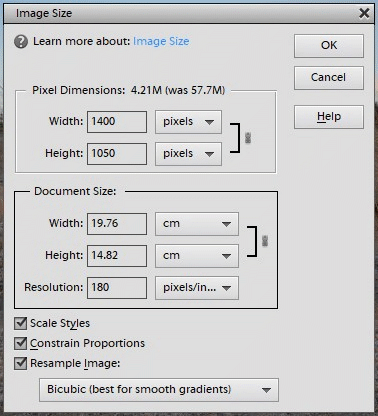
The resizing dialogue in Photoshop Elements 12 looks like this.
Windows 10 has a program called Paint3D which, despite its name, has some useful facilites for photographic images. It can open, resize and save images in a variety of formats. You cannot control JPEG file size though.
The following describes the steps for resizing, as of 1/11/2018; Win10 updates may change this of course (grrr!!).
1. Run Paint3D and you will see an icon top left for a menu: 
2. Click the menu icon to get a page of options:
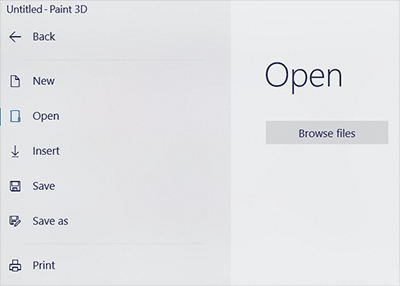
3. You can see that the "Open" option gives you a "Browse" button. It enables the opening of images in various formats, including JPEG and TIFF.
4. Along the top there is an icon marked canvas: 
5. Click that to get a display like this:
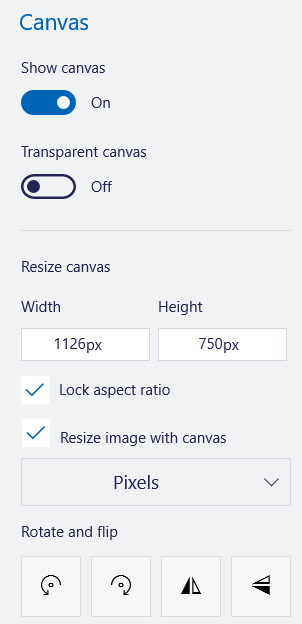
6. Type in your required width and/or height and hit the Enter key to resize.
7. Go to the menu again to select "Save as" and then "Image". Formats offered again include JPEG and TIFF among others.